How to Reconcile Amazon Payments If you are selling on Amazon, reconciling your payments is one of the most important financial tasks. Even though Amazon sends payouts automatically, there are many fees, adjustments, refunds, and taxes involved which means the amount Amazon shows and the amount you actually receive in your bank can differ. Without proper reconciliation, your accounts may not match, leading to confusion, cash flow problems, and issues during audits.
This guide will explain Amazon payment reconciliation in a simple and practical way what it is, why it’s necessary, how to do it step-by-step, the reports you need, and best practices.
What Is Amazon Payments Reconciliation?
Reconciliation means matching and verifying the payment details that Amazon provides with your internal records (orders and invoices) and your bank statement.
In other words, you are checking:
-
How much you sold.
-
How much Amazon deducted in fees.
-
How much refund Amazon issued to customers.
-
How much was finally transferred to your bank.
-
Whether any difference exists and why.
This ensures your revenue, profit, and taxes are recorded accurately.
Why Is It Important?
Proper reconciliation helps you:
-
Track actual profit after fees and taxes.
-
Avoid accounting errors caused by automatic deductions.
-
Identify missing or delayed payments.
-
Maintain clean financial records for GST or tax filing.
-
Make better business decisions based on clear financial data.
Many Amazon sellers skip reconciliation and face confusion later when filing taxes or calculating margins. So, doing this regularly is essential.
Important Amazon Reports You Need
You will find all of these in Amazon Seller Central:
| Report Name | Purpose |
|---|---|
| Settlement Report | Shows final payout after fees and adjustments. |
| Transaction / Payment Report | Shows each order-level credit and debit entry. |
| Order Report | Shows details of every order (price, quantity, discount). |
| Fee Reports (FBA Fee / Referral Fee / Shipping Fee) | Shows different fees Amazon deducted. |
| Return & Refund Report | Shows refunds that impact net payout. |
| Your Bank Statement | Shows the actual funds credited to your account. |
Step-by-Step Amazon Payment Reconciliation Process
Follow this practical workflow:
Step 1: Select the Period
Decide whether you will reconcile every:
-
Week
-
15 Days (matching Amazon settlement cycle)
-
Month
Frequent reconciliation reduces errors later.
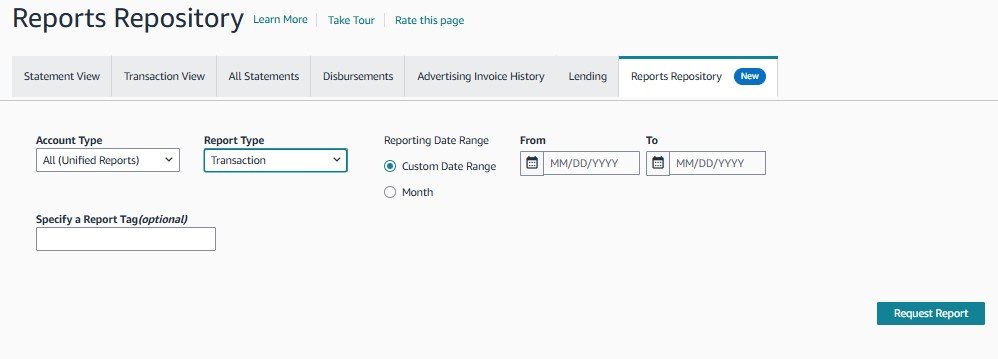
Step 2: Download Your Settlement Report
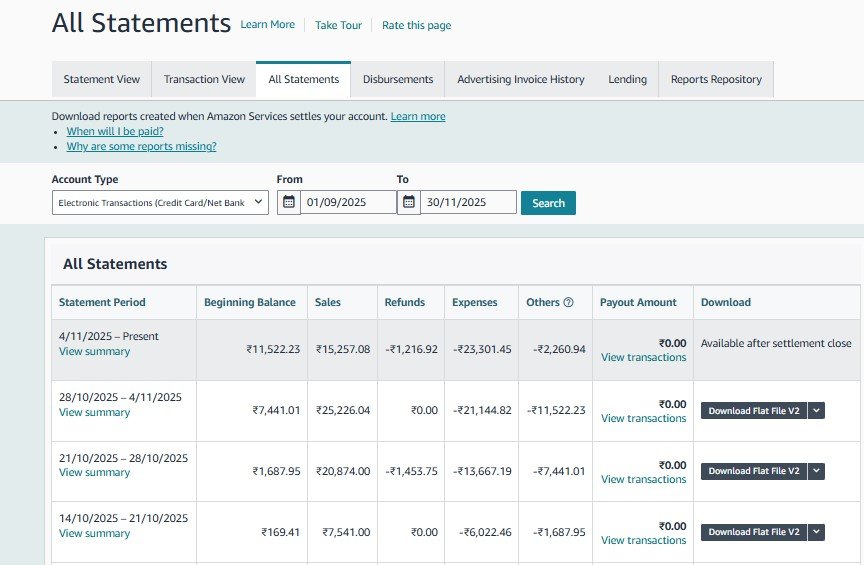
Go to:
Reports → Payments → All Statements → Download Settlement CSV
This report contains:
-
Sales revenue
-
Refunds
-
Amazon fees
-
Final amount Amazon transferred
Step 3: Match Settlement Total with Bank Credit
Check the final payout amount in the settlement report and match it with your bank statement.
If the payout dates differ by 1–2 days, it’s normal.
Step 4: Breakdown Transaction-Level Entries
Now verify:
-
Total Sales
-
Refunds issued to customers
-
Shipping charge reimbursements (if any)
-
Discounts / promotions
-
All types of Amazon fees
This helps you find the net revenue earned during that period.
Step 5: Verify Fees
Amazon deducts:
-
Referral Fee
-
FBA Fulfillment Fee
-
Closing Fee
-
Storage Fee
-
Advertising Charges (if ads were running)
Make sure each fee matches your product category and price.
Step 6: Identify Mismatches
Some common mismatches include:
-
Refund not reflected correctly
-
Fee deducted twice
-
Customer returned empty box (A-to-Z claim)
-
Wrong product weight fee charged under FBA
List these differences in a separate sheet for review.
Step 7: Post Accounting Entries
Record:
-
Sales revenue in sales ledger
-
Refunds in returns ledger
-
Each type of Amazon fee under relevant expense ledger
-
Final bank credit as settlement receipt
If you use software (Tally / Zoho Books / QuickBooks), record entries systematically.
Step 8: Save Documentation
Always store:
-
CSV reports
-
Reconciliation worksheet
-
Screenshots of discrepancies (if any)
-
Bank statements for the period
This supports you during GST filing, audits, and disputes.
Common Problems and Their Solutions
| Problem | Reason | Solution |
|---|---|---|
| Payment amount doesn’t match bank | Settlement posted but bank cleared later | Match with settlement cycle dates, not only bank dates |
| Fees appear unclear | Multiple fee types bundled | Enable detailed fees breakdown in Payments report |
| Return deducted but product not returned | Return fraud or A-to-Z claim | Raise ticket with supporting proof |
| Advertising charges reducing profit | Unmonitored ad campaigns | Optimize ads and track ACoS regularly |
Helpful Tools for Easier Reconciliation
| Tool | Use |
|---|---|
| A2X | Automates Amazon to accounting software mapping |
| Zoho Books / QuickBooks | Simplifies journal entry posting |
| Excel / Google Sheets Templates | Best for manual tracking |
| Webgility | Connects multi-channel sales and accounting |
If your order volume is high, automation can save a lot of time — but always review manually before posting final accounts.
Best Practices for Smooth Reconciliation
-
Reconcile every settlement cycle (never skip).
-
Maintain separate ledgers for each fee type.
-
Keep organized digital folders for reports by month.
-
Monitor refund trends to detect return abuse.
-
Review product-level profitability after fees.
Final Conclusion
Amazon Payments Reconciliation may seem complex at first, but once you follow a structured process, it becomes manageable and highly beneficial. It ensures accurate accounting, proper tax reporting, and clear visibility into whether your business is truly profitable.